
When I designed this cabinet and was thinking about the knife hinges and door pulls I had copper in mind. I felt it was a better suit for the color of the swiss pear veneer rather than traditional brass hardware. The only problem was the two largest fine hardware suppliers, Sanderson Hardware and Brusso Hardware, do not make copper hinges…
Making the hardware requires a few different numeric drill bits, 2 drilling reamers and a 82 degree countersink. In this picture above a number 31 numeric bit was used to drill a hole through both leaves of the knife hinge. Knife hinges were cut out of solid 1/8 ” copper flat stock and then filed and sanded. Before drilling, both leaves were crazy glued together so the shaping and drilling of all holes were consistent in both halves…I think that makes sense?

It is important to set up a fence and some sort of hold down when drilling these small metal pieces. Finding center can be a bit of a hit or miss, especially if your eyesight sucks like mine, but take your time and have some test pieces to practice on.
I found drilling copper quite a bit different than brass. I actually broke two 1/8″ drill bits when drilling these little pieces. I tried oil on the second bit but it still broke. In the picture I am using a drill bit I ordered through Maritool ( A tool manafacturer that sells high end milling and drilling bits). You can see the copper twisted around the flutes of the bit. This bit did not break and it didn’t need cutting fluid so I figured it must have had a lot to do with the evacuation of copper waste that this bit excelled at. Bottom line if you are using ordinary twist drill bits, get rid of chips often!!

After drilling for the hinge pins, screw holes and countersinking, the hinges are soaked in Acetone to break the crazy glue joint. This allows for drilling and reaming for pins.

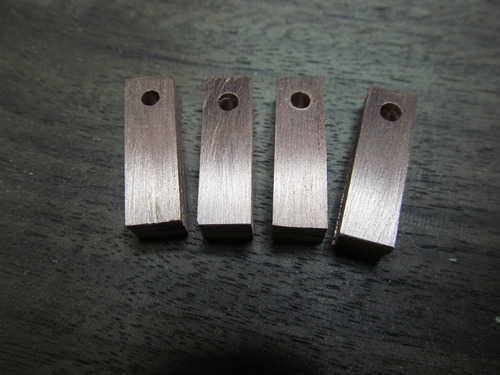
Knife hinges after drilling. Bottom leaf is reamed with .1247 drilling reamer for a press fit of the 1/8 drill rod pin. Top leaf is reamed with a 1260 drilling reamer for a slip fit of the drill rod.

Drill rod is placed. Drill rod was cut using a vise and a dremel tool with a fibreglass cut off disc. This small piece is placed in the upper leaf and then tapped down into the bottom press fit drill hole. I used a hammer and my table saw surface for a flat reference. Remember to place your washer material between the leaves to keep them parallel as you tap the drill rod into the bottom leaf.

Copper hinges also need copper washers. Couldn’t find what I wanted so I made my own following a demonstration that Robert showed us at Inside Passage. Small squares of copper plate with a 1/8″ hole drilled through the center. Later I used a disc sander and rode the block of wood right up agaisnt the disc. I used a pencil to rotate the square until I acheived a round washer. Drilling various holes close to the edge will give you different sized washers. It was hit and miss until I made a washer that looked pretty good with my hinges.

A pretty nice install, still have to file down the protruding pin excess. I do have one problem with making my own copper knife hinges, no where can I find number 2, 1/2″ long copper screws. I think I’ll try some electo plating at school and see how that goes…..

Nice how to sir. This is exactly what I was looking for.
As far as screws, would silicon bronze be close?
http://www.mcfeelys.com/product/0804-SFC/8-x-12-Boat-Screws-Silicon-Bronze-Flat-Head-Square-Drive
Also, where did you get the reamers from?
Thanks!
Ev
Sorry for the really late reply Everett, school has been keeping me really busy and I am also a car nut so my mustang has been keeping me really busy too. I am glad I could help a bit on the knife hinges. I got all my drilling reamers and drill bits from Maritool. Awesome company, check them out on the web.
Bob